| 일 | 월 | 화 | 수 | 목 | 금 | 토 |
|---|---|---|---|---|---|---|
| 1 | ||||||
| 2 | 3 | 4 | 5 | 6 | 7 | 8 |
| 9 | 10 | 11 | 12 | 13 | 14 | 15 |
| 16 | 17 | 18 | 19 | 20 | 21 | 22 |
| 23 | 24 | 25 | 26 | 27 | 28 | 29 |
| 30 |
- 코딩 어?
- 중첩배열
- 문자열순서바꾸기
- js 문자열을 문자배열로
- 중복단어제거
- 깃 토큰 만료
- @Moditying @Query
- 우분투 시간 변경
- ubuntu타임존
- 제로베이스
- 프론트엔드 스쿨
- 객체의키값만 찾기
- 객체의 밸류값만 찾기
- ...점점점문법
- 중복문자제거
- sql 문자열 패턴 검색
- 시퀄 문법
- 중첩배열평탄화
- indexOf()
- 5.3.8 Modifying Queries
- 재귀스왑
- 문자열 중복
- 중복 문자열
- 배엘에서 스왑
- 스프링 데이타 JPA
- 중복된 단어
- lastIndexOf()
- 단어 제거
- 레디스 확인
- 아래로펼치기
- Today
- Total
코딩기록
항해 36일) Node.js, 백엔드 jwt 토큰, 프론트 없이 Thunder client에서 jwt토큰으로 authMiddleware 게시글생성, 수정, 삭제하기 본문
항해 36일) Node.js, 백엔드 jwt 토큰, 프론트 없이 Thunder client에서 jwt토큰으로 authMiddleware 게시글생성, 수정, 삭제하기
뽀짝코딩 2022. 2. 14. 16:27Thunder client에서 jwt토큰을 입력해 게시글 생성,수정,삭제등 본인 확인(authMiddleware)이 필요한 작업을 했다.
혼자서 로그인하는 게시판을 만들때는 프로트에서 값을 입력받아 게시판 생성,수정,삭제 등을 했기때문에 Thunder client를 자주 사용하지 않았다. 프론트 없이 jwt토큰이 입력 됐다 치고 게시판 생성, 수정, 삭제 하는 방법이 생각보다 오래 걸려 다음번에는 좀 더 시간을 절약 하고자 기록한다.
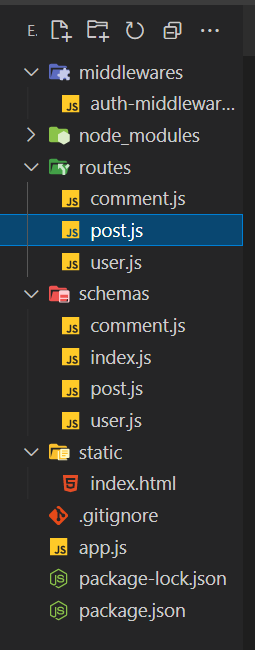
폴더구조

middlewares 폴더
auth-middleware.js
const jwt = require('jsonwebtoken');
const User = require('../schemas/user');

module.exports = (req, res, next) => {
    const { authorization } = req.headers;
    const [tokenType, tokenValue] = authorization.split(' ');
    if (tokenValue == 'null') {
        res.locals.users = null;
        next();
        return;
    }

    if (tokenType !== 'Bearer') {
        res.status(401).send({
            errorMessage: '로그인 후 사용하세요 🙄'
        });
        return;
    }

    try {
        const { userId }  = jwt.verify(tokenValue, 'secret-key');
        User.findOne({ userId })
        .exec()
        .then((user) => {
            res.locals.users = user;
            next();
        });
    } catch (error) {
        res.status(400).send({
            errorMessage: '로그인 후 사용하세요 🙄',
        });
        return;
    }
}
schemas폴더
user.js
const mongoose = require('mongoose');
const AutoIncrement = require('mongoose-sequence')(mongoose);

const usersSchema = new mongoose.Schema({
    email: {
        type: String,
        require: true,
        unique: true
    },
    password: {
        type: String,
        require: true,
    },
    nickname: {
        type:String,
        require:true,
        unique:true
    },
    git: {
        type:String,
    },
    blog: {
        type:String,
    },
    userIcon: {
        type:String,
    }
});

usersSchema.plugin(AutoIncrement, {inc_field: 'userId'});

module.exports = mongoose.model ('User', usersSchema);
schemas폴더
post.js
const mongoose = require("mongoose");
const AutoIncrement = require("mongoose-sequence")(mongoose)

const postSchema = new mongoose.Schema({
    nickname: {
        type: String,
        required: true
    },
    userIcon: {
        type:String
    },
    content: {
        type: String
    },
    imgUrl: {
        type: String
    },
    date: {
        type: String
    },
    // comment_cnt: {
    //     type: Number
    // }
});

postSchema.plugin(AutoIncrement, {inc_field: 'postId'});

module.exports = mongoose.model("Post", postSchema);
routes폴더
post.js
const express = require("express");
const router = express.Router(); //라우터 선언
const Post = require("../schemas/post");
const authMiddleware = require("../middlewares/auth-middleware");

// // Post 관련 정보 불러오기
router.get("/post", async (req, res) => {
  try {
    const post = await Post.find({}).sort("-date").exec();
    const user = res.locals.user;
    res.json({
      post, user
    });
  } catch (error) {
    res.status(400).json({ error: error.message });

    console.log("라우터post 전체목록조회 post값: " + post);
  }
});


//Post 생성
router.post("/post", authMiddleware, async (req, res) => {
  const {content, imgUrl } = req.body;
  const userIcon = res.locals.users.userIcon
  const nickname = res.locals.users.nickname

  //db의 date 호출전 날짜 형식 맞추기   //2022-02-03 09:40:10 형식으로 출력
const date = new Date(+new Date() + 3240 * 10000).toISOString().replace("T", " ").replace(/\..*/, "");
  try {
    await Post.create({ nickname, userIcon, content, imgUrl, date });
    res.status(200).json({
      ok: true,
      message: "생성 성공"
    });
  } catch (err) {
    res.status(400).json({
      ok: false,
      errorMessage: "생성 실패"
    });
  }
});
//Post 생성
// 썬더 포스트생성 바디
// {
//     "content": "토큰 게시글입력 테스트",
//     "imgUrl": "https://www.google.com/imgres?imgurl=https%3A%2F%2Fimage.msscdn.net%2Fimages%2Fgoods_img%2F20191216%2F1252014%2F1252014_1_500.jpg&imgrefurl=https%3A%2F%2Fstore.musinsa.com%2Fapp%2Fgoods%2F1252014&tbnid=3vNacgxz1vVfBM&vet=12ahUKEwjxhYDzu_f1AhVsz4sBHeXSA2QQMygeegUIARCUAg..i&docid=5VYXw3FcqVcrnM&w=500&h=500&q=%EA%B0%95%EC%95%84%EC%A7%80&ved=2ahUKEwjxhYDzu_f1AhVsz4sBHeXSA2QQMygeegUIARCUAg",
// }
// 썬더 Auth > OAuth2 >Access Token  (master토큰)
//

// Post 상세 보기
router.get("/detail/:postId",  async (req, res) => {
    try {
      const { postId } = req.params;
      console.log( typeof postId);
      // const [detail] = await Post.findOne({ postId });
      console.log( postId);
      console.log("111넘버postId", Number(postId)  );
      const detail = await Post.findOne({ postId: Number(postId) });
      const userIcon = detail.userIcon // 로컬에서 userIcon 찾기

      res.status(200).json({
        ok: true,
      detail,
      userIcon,
      message: "상세페이지 보기 성공"
    });
  } catch (err) {
    res.status(400).json({
      ok: false,
      errorMessage: "상세페이지 보기 실패",
    });
    console.log("Post 상세페이지 보기 실패: " + err);
  }
});


// //Post 수정하기
router.put("/item/:postId", authMiddleware, async (req, res) => {
  const { postId } = req.params;
  const { content, imgUrl } = req.body;
  const nickname = res.locals.users.nickname
  const existPost = await Post.findOne({ postId: Number(postId) });
  console.log(11, nickname);
  console.log(22, existPost);
  if (existPost.nickname !== nickname) {
    return res.status(400).json({
      existPost,
      ok: false,
      message: "수정 실패"
    });
  } else if (existPost.nickname === nickname) {
        await Post.updateOne({ postId: Number(postId) }, { $set: { content, imgUrl }});
    }
    res.status(200).json({
        ok: true,
        errorMessage: "수정 성공",
      });

});
// {
//   "content": "수정수정테스트",
//   "imgUrl": "https://www.google.com/imgres?imgurl=https%3A%2F%2Fpurplejam.kr%2Fcontent%2Fimages%2F2020%2F02%2Fshutterstock_1544993138-1.jpg&imgrefurl=https%3A%2F%2Fpurplejam.kr%2Fcat-whiskers%2F&tbnid=PPqYOsFYQ7knIM&vet=12ahUKEwj21oXQvfn1AhXZOnAKHcShDaYQMyhMegQIARBu..i&docid=zt5_8DNuqu8prM&w=2000&h=1333&q=%EA%B3%A0%EC%96%91%EC%9D%B4&ved=2ahUKEwj21oXQvfn1AhXZOnAKHcShDaYQMyhMegQIARBu"
// }


// //Post 삭제하기
router.delete("/item/:postId", authMiddleware, async  (req, res) => {
  const { postId } = req.params;
  const nickname = res.locals.users.nickname
  const existPost = await Post.findOne({ postId: Number(postId) });
  if (existPost.nickname !== nickname) {
    return res.status(400).json({
      nickname,
      existPost,
      ok: false,
      message: "삭제 실패"
    });
  } else if (existPost.nickname === nickname) {
      await Post.deleteOne({ postId: Number(postId)});
  }
  res.status(200).json({
    ok: true,
    errorMessage: "삭제 성공"
  });
});


module.exports = router;
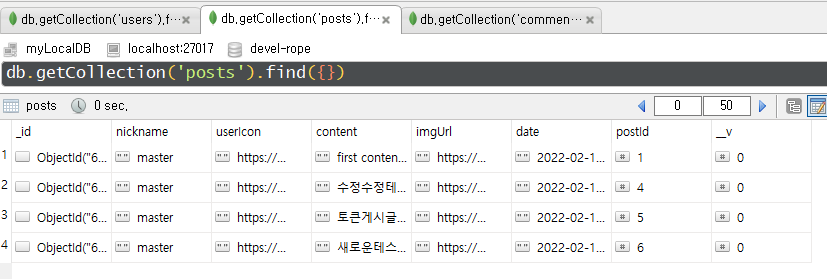
현재 디비에 게시글을 작성한건
아이디 : email@eamil.com
닉네임: master
란 유저이다.

routes 폴더 > post.js 를 보면 Post수정에 authMiddleware가 있다.
routes > post.js
// //Post 수정하기
router.put("/item/:postId", authMiddleware, async (req, res) => {
  const { postId } = req.params;
  const { content, imgUrl } = req.body;
  const nickname = res.locals.users.nickname
  const existPost = await Post.findOne({ postId: Number(postId) });
  console.log(11, nickname);
  console.log(22, existPost);
  if (existPost.nickname !== nickname) {
    return res.status(400).json({
      existPost,
      ok: false,
      message: "수정 실패"
    });
  } else if (existPost.nickname === nickname) {
        await Post.updateOne({ postId: Number(postId) }, { $set: { content, imgUrl }});
    }
    res.status(200).json({
        ok: true,
        errorMessage: "수정 성공",
      });
});
이 어스미들웨어를 통해 user디비에 있는 nickname정보를 아래 코드로 가져와서
const nickname = res.locals.users.nickname아래 지금 수정하려는 nickname이 디비에 있는 nickname과 같은지 비교하고 같으면 post디비를 수정 한다.
if (existPost.nickname !== nickname) {
    return res.status(400).json({
      existPost,
      ok: false,
      message: "수정 실패"
    });
  } else if (existPost.nickname === nickname) {
        await Post.updateOne({ postId: Number(postId) }, { $set: { content, imgUrl }});
    }
    res.status(200).json({
        ok: true,
        errorMessage: "수정 성공",
      });
이 authMiddleware는 middlewares 폴더 > auth-middleware.js
에서 25번 줄에서 res.locals.users라고 설정했고

routes폴더 > post.js에서 4번 줄에서 authMiddleware 변수명으로 가져왔다.

Thunder Client 썬더클라이언트
그럼 본론으로 들어가서 프론트단 없이 백에서 본인 확인이 필요한 api 값을 확인할때는 Thunder Client를 쓴다.

위 사진에서 왼쪽라인 블럭모양이 Extensions인데 여기에서 Thunder client를 검색해 설치하면 된다.

썬더클라이언트에서 New Request 를 누르면 아래와 같이 나오는데

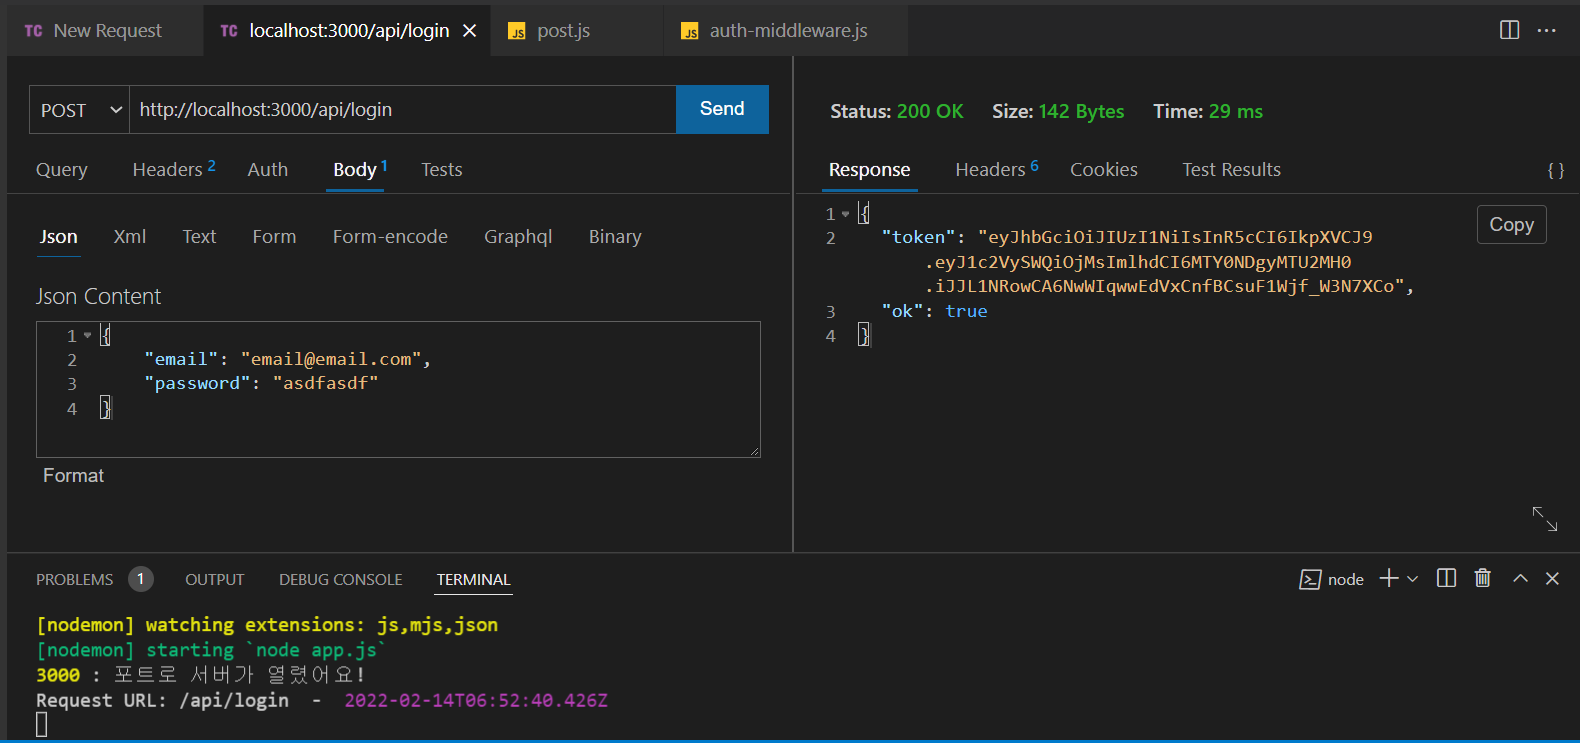
로그인해서 Token값 받기
먼저 터미널에서 서버를 열고 로그인api에 작성한 url주소를 입력후 token값을 받아온다.

썬더클라이언트에서 Token값 입력후 Post 수정
1). 위 토큰값을 따로 저장하고
Auth > OAuth2 > Access Token 에다 따로 저장한 토큰을 "~~~" 쌍따옴표 안의 텍스트(~~~)만 넣는다.

2) Post수정 api의(라우터폴더 > post.js) req.body로 받는 값은 content, imgUrl 두가지이다. Body에 그 두가지를 적고
Send 를 누르면 오른쪽 Response 에 결과가 나온다.

3) 디비 확인
postId 4번의 content가 변경되었다.

참고
* 내 코드, 내 디비
* 백엔드가 이정도는 해줘야 함 - 5. 사용자 인증 방식 결정
*[시큐어코딩]보안기능 -중요정보 평문 저장 / 지에스인포
https://m.blog.naver.com/gs_info/221479972783
'항해99 > 챕터4 미니프로젝트' 카테고리의 다른 글
| 항해 35일) 미니프로젝트- CORS란?, 오류 해결방법 (0) | 2022.02.13 |
|---|

